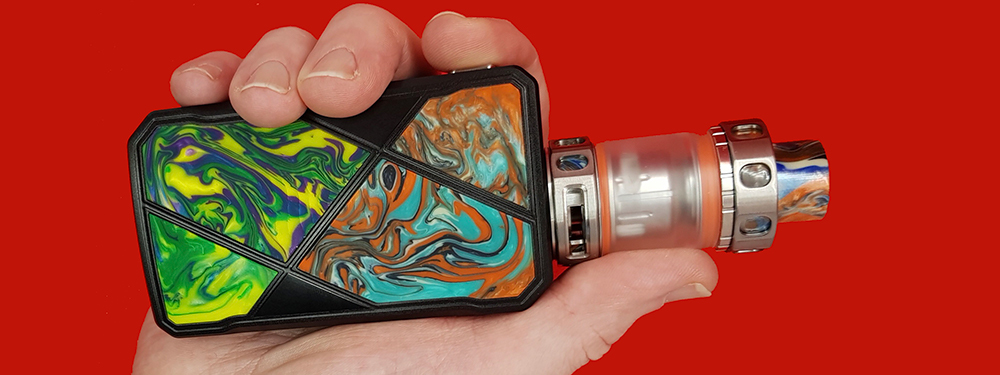
 FreeMax Maxus 200W kit
The new releases from FreeMax continue to come in thick and fast. Last time I took a look at the new FreeMax Maxus 100W kit, and today it’s the turn of its bigger brother, the FreeMax Maxus 200W kit which includes the dual 18650 Maxus 200W box mod and the M Pro 2 tank, an evolution of the popular M Pro tank. The Maxus 200W shares many of the features of the Maxus 100W including the SmartLoad Tech battery management, so hopefully this review won’t be quite as long winded!
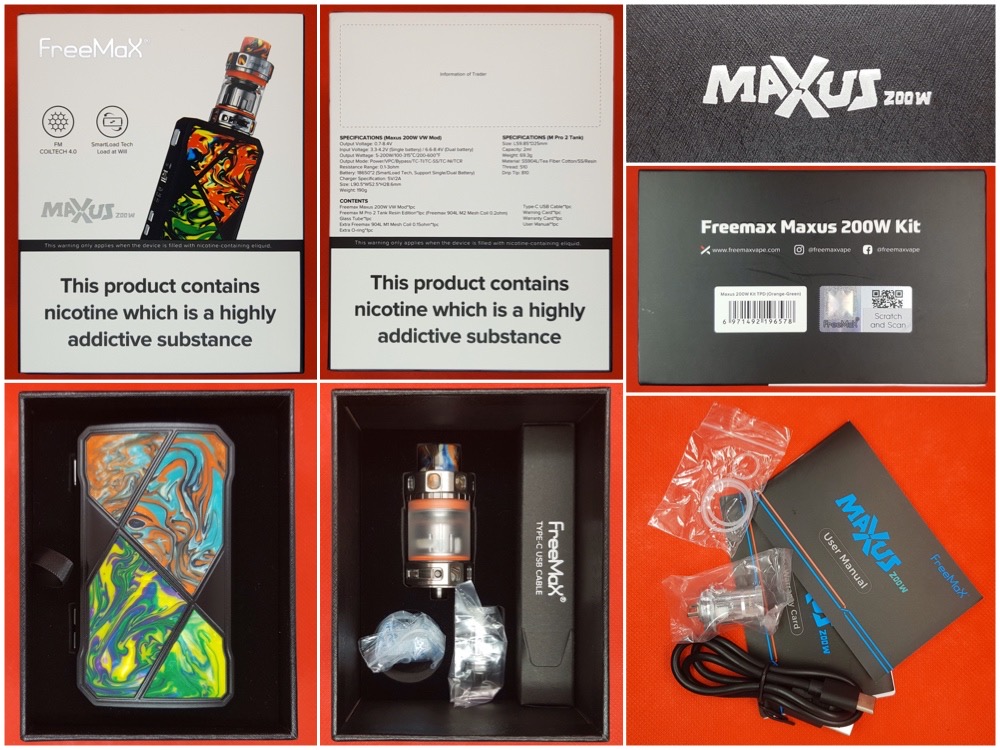
The FreeMax Maxus 200W kit comes in an outer sleeve with a prominent picture of the kit in your chosen colour on the front, a list of kit contents and specifications on the back, and the usual social media links and scratch ‘n’ sniff authentication code on the sides. Inside this is a black box with large “Maxus 200W” branding on the front and once again there are convenient finger cutouts on the lid to aid in removing it.
Once opened, you’re presented with Maxus 200W on the top layer, and on the bottom layer under the instruction manual and other paperwork there’s the M Pro 2 tank, spare o-rings and a second coil for the tank alongside a smaller box with a usb-c cable. Once again, there’s space for a spare glass for the M Pro 2 tank but one isn’t included here but I think this is because this kit is from the trial production run as a bubble tank is shown on the FreeMax Maxus 200W kit webpage for the TPD edition.
FreeMax Maxus 200W Mod
Specifications
- Size 90.5x52.5x28.6mm
- Weight 190g
- Dual 18650 battery with SmartLoad Tech
- 5volt / 2amp charging
- Modes Power/VPC/Bypass/TC
- Output 0.7-8.4volts / 5-200 watts
- Resistance range 0.1-3.0Ω
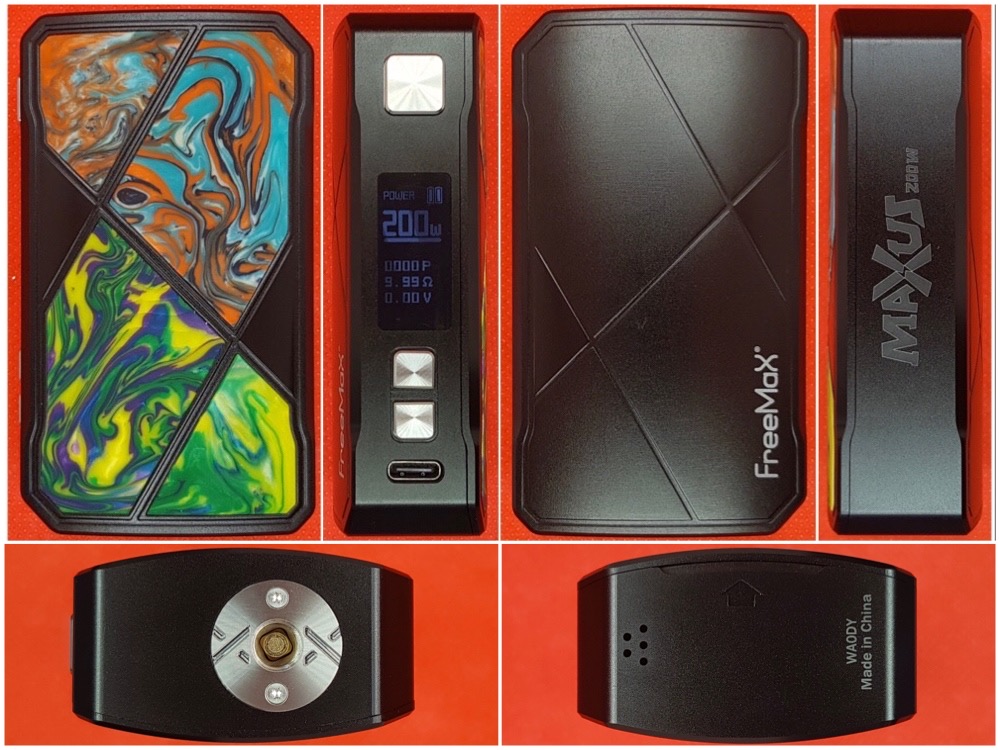
If you thought the Maxus 100W looked like the single battery Voopoo Drag of your dreams, then this will seem even more familiar. In fact it’s almost exactly the same size and shape as my Voopoo Drag 2!
Once again there are bold resin inserts on the battery door, this time in the orange-green variant. This wouldn’t have been my first choice but I have to say it looks much better in the flesh than I expected, but I still suspect some of the colour variants are going to be much more popular than others. Unlike the Voopoo Drag, the back is much more understated with a simple FreeMax logo screen printed on the corner. It’s not completely without branding though as there’s a large “Maxus 200W” logo screen printed down the spine instead.
Up top, the 510 plate is slightly off centre and even with the beveled edges along the top you can still comfortably fit atomisers up to 26mm wide without any overhang. The 510 plate is raised just a hair off the mod which protects the top from the dreaded atty rash but can lead to apparent “gapping” which I know others dislike. Personally, I’d rather have the paintwork protected so I consider this to be a plus, and I haven’t noticed any wear on the paint through general use which I experienced on the Maxus 100W.
On the bottom you find some ventilation for the board along with a convenient finger cutout to remove the side panel allowing access to the battery compartment. The side panel is held in place with two large magnets. There is a tiny bit of side to side movement in the panel, however I think some wiggle with this kind of design is inevitable and there’s far more on the door of my Voopoo Drag 2, for example.
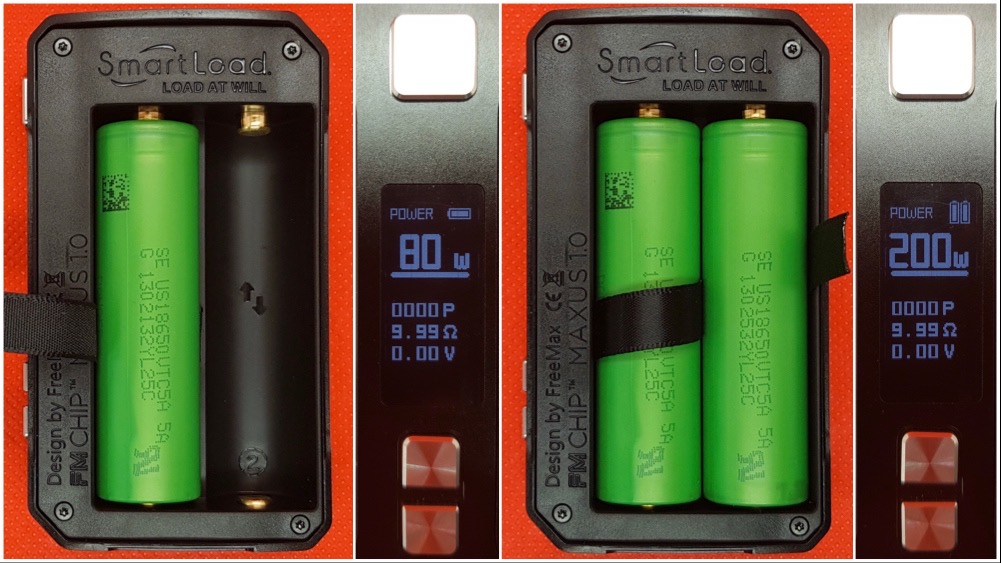
The battery compartment is neatly laid out and there’s a ribbon to help with removal, plus there are spring loaded battery contacts at the top with fixed contacts on the bottom. Although the battery slots are labelled “1” and “2”, there aren’t any battery orientation labels because the Maxus 200W utilizes FreeMax’s new “SmartLoad Tech - Load At Will” which should mean it doesn’t matter which way round you put the batteries. The SmartLoad Tech will work out what you’ve done and allow safe operation of the mod (if you listen carefully as you put a battery in you’ll hear the mod click as it polls the batteries). Obviously as the Maxus 200W is a dual battery mod, this works a little differently than the single battery Maxus 100W so I think it’s probably worth spending a little more time on this feature.
- You can use the Maxus 200W as a single battery mod by placing a battery, in either orientation, in slot “1”. The mod will now act as a single 18650 mod and limit you to 80 watts.
- Placing a single battery in slot “2” will do nothing, the mod will remain powered off.
As an experienced user, the fact that the Maxus 200W allows operation with just a single battery screams “Parallel battery mod” (both batteries orientated in the same direction) to me so that’s how I proceeded next.
-
You can place two batteries in parallel (both +ve up, or both +ve down) and the full 200W now becomes available.
The next thought was what happens if you place the batteries in series?
-
Placing the batteries in series (one +ve up, one +ve down) and the full 200W is available.
I don’t know what sort of wizardry FreeMax is using here but the SmartLoad tech certainly seems very clever. Personally I’ve been using the Maxus 200W as a parallel mod as that seems more natural to me given that the only other time I’ve seen dual battery mods be able to run with a single battery is in that configuration.
The front panel is laid out in exactly the same way as the Maxus 100W with a bright led screen nestled between the power and up/down controls, and although it’s not the biggest screen I’ve seen, the information is clearly laid out and I can (just about) manage to read it without having to automatically reach for my glasses. It’s fairly bright too and I was still able to read it outside in the usually bright sunshine we’ve been experiencing recently. All the buttons are super clicky and need a decent amount of pressure to activate, so much so I haven’t felt the need to use the control lock feature (pressing both +/- locks power adjustability). There’s absolutely zero button rattle either. The menu utilises a series of nested menus which are all clearly laid out, and it’s a doddle to navigate around to the features you want so I barely had to look in the manual. Finally, at the bottom of the front panel there’s a USB-C port for charging and in my test, the Maxus 200W charged at about 1.76 amps and remained cool whilst charging.
The Maxus 200W has a full featured board with all the modes and safety features you would ever need, and power delivery seemed consistent throughout. For the temperature control (TC) test, I broke out my faithful Serpent Mini again and the Maxus 200W also performed well in TC mode with a consistent vape, although it did benefit from manually adjusting the wattage. Once the vape was virtually non-existent, I examined the wick which was bone dry so a broad pass on the TC mode from me. If you want to enter a manual TCR setting, I was also impressed that this displays a list of suggested values for common TC wires, a nice touch and something I don’t recall seeing previously. Additionally, if you’re in power mode and you put on a new tank the Maxus 200W will suggest TC mode if it detects a TC coil. I’ve found this feature to be a bit hit and miss though.
Maxus 200W Pros
- SmartLoad Tech - install your batteries in either orientation including single battery mode, and dual battery mode in parallel or series configuration
- Clear screen and well laid out menu
- Good power delivery and working TC
Maxus 200W Cons
- Some of the colour combinations are a bit “out there”
- Slight movement on battery door (I’m being nit picky here!)
M Pro 2 Tank
Specifications
- Size 59.85x25mm
- Weight 69.3g
- 2ml Capacity (TPD) [5ml in non-tpd regions]
- FM coiltech 4.0 coils (SS904L mesh + tea fibre cotton)
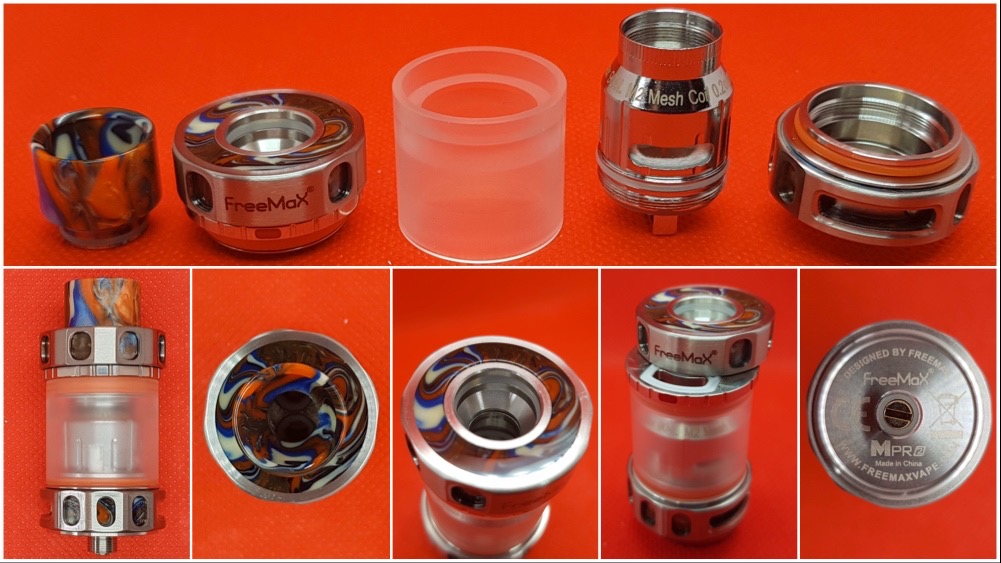
The M Pro 2 tank included in the kit is an evolution of the of the popular M Pro tank with Freemax’s updated FM Coiltech 4.0 coils which utilise military grade SS904L mesh and tea fiber cotton formula which was also used in their recent AutoPod50 kit. It’s a standard sub-ohm tank design which I’m sure we’re all familiar with by now which breaks down into five parts as you can see above. The “resin version” is included in the kit, this time it features resin inlays in a metal chassis rather than the chunky full resin designs seen previously and I think it looks all the better for it. It’s almost a full centimetre taller than the Fireluke 3 I recently used and has a much more angular, industrial look with its chunky facets with resin inlays on the airflow control and fill cap. I much prefer the more streamlined look of the Fireluke 3 personally.
The supplied “glass” is plastic (Polycarbonate?) and has a built up section inside near the top o-ring which I suspect is the only way FreeMax could make this tank TPD compliant. I believe final retail packages will also include a bubble glass but that wasn’t present in this trial production run sent out to reviewers.
Up top is a standard 810 drip tip with double o-rings, but there’s also an o-ring in the catch cup so standard 810 drip tips without an o-ring also work. There’s a reasonably sized fill hole revealed by pressing the top cap from the area with the FreeMax logo and red dot. FreeMax has beefed up this area with three ball bearings to ensure that the top shouldn’t come open in your pockets. Obviously in this TPD edition there’s only a 2ml capacity which means you're going to be filling this up quite frequently.
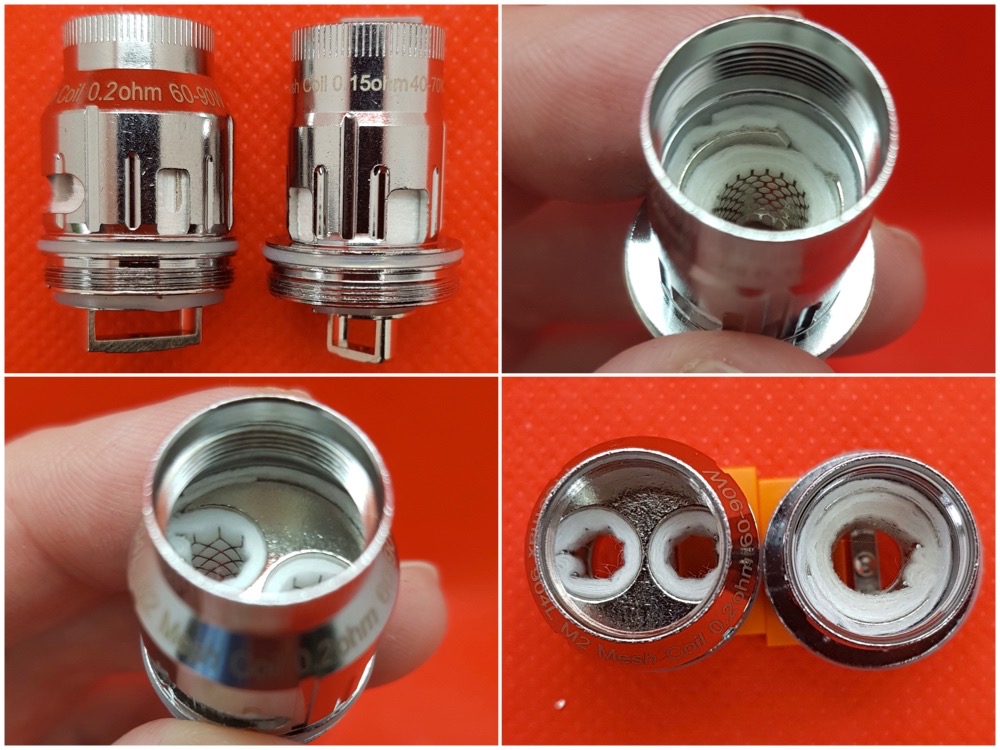
Two coils are included in the kit, a 0.2Ω M2 dual coil with a net style mesh, and a 0.15Ω M1 single coil with a honeycomb mesh style design. Two other coils are available as well and you can find more information on those on the M Pro 2 page.
The 0.2Ω dual mesh is rated for 60 to 90 watts. At 60 watts I found it to be a rather anemic vape which was very cool and a little lacking in flavour. Even with the airflow cut almost all the way down, the flow remains smooth throughout. This really needs 80W+ to produce good flavour and a bit of heat, in fact I was able to push this coil all the way up to 100 watts without issue.
The 0.15Ω single mesh coil is rated for 40 to 70 watts, and at the 40 watts it was still a rather anemic vape as with the 0.2Ω coil. This really needs 60 watts to start producing good flavour but only really starts to pop at the 65W mark, and I was able to push past the suggested max to 75 watts before I began to detect the start of a dry hit. Flavour is fantastic anywhere in the 60 to 75 watt range but, as you’d expect, this is going to guzzle through eliquid at a rate of knots. Watch out for the o-ring on this coil, it moved out of position on mine but luckily I spotted it before I filled the tank.
Both the coils use FreeMax’s latest coiltech 4.0 SS904L technology and, as I highlighted in my review of the Maxus 100W, these may not be the best choice if you have a nickel sensitivity like myself. However the M Pro 2 is compatible with the coils from the M Pro and these are Kanthal.
Fireluke3 Pros
- Good looks, I particularly like the resin inserts
- Good performance from the coils
- Compatible with previous M Pro coils (Kanthal)
- Three ball bearing system on top reduces chances of opening in pockets
Fireluke 3 Cons
-
SS904L coils may not be suitable for those with nickel allergies
Conclusion
Freemax have outdone themselves again here. Some of the available colour combinations might not appeal to everyone but I was pleasantly surprised by the one sent out for review as this was one of the colours I didn’t think I’d like and it definitely looks better than I thought it would in the flesh. The FreeMax FM chip is turning out to be a very capable board, and the SmartLoad battery tech still leaves me stunned at its versatility and I think this is potentially a big step up for battery safety. The M Pro 2 tank tank also performs well as you would expect from Freemax with their long standing expertise and innovation in mesh coil technologies, and I think this provides a great visual update to the previous M Pro Tank.
Many thanks to Freemax for sending the Maxus 200W kit in for review.

Antony Lord
Reviewer at POTVI was a twenty a day smoker for 25 years and like most smokers I was always going to quit "next week". Having hit my mid forties and having the usual smokers cough and difficulty with anything more than moderate exercise it was obviously time to give up the cancer sticks. I bought my first e-cigarette in 2013 when they were expensive, difficult to find and quite frankly... crap. I used it for about a week then went back to the roll ups, mark up another failed quit attempt. The fact that I had just changed jobs and was under quite a lot of stress probably didn't help. Move on to 2016 and whilst I was browsing eBay I noticed that one of the suggested items that would occasionally pop up was for a cheap e-cigarette. It looked similar to the one I'd bought 3 years earlier but it was only £5 (about 8 times cheaper than before) so I decided to give it another go on a whim. Once the kit arrived I managed to gradually replace the cigarettes with my new kit over a two month period and got into watching YouTube reviews for newer kit. My cheap and cheerful kit was replaced by a more upmarket affair, and being a noob I made a mistake once it arrived... I put in the supplied direct lung coil, this was of course a complete revelation and I haven't touched a cigarette since. Oh and I no longer spend the first five minutes of every day having a coughing fit either.
Join the discussion
Vaporesso GEN SE
Stephen got his grubby little mitts on the new Vaporesso Gen SE kit and this is what he thought
Kumiho Thoth S pod
Antony takes a look at the Kumiho Thoth S pod kit after being impressed with their last offering
NIXER X Jack Rabbit Longfills
We reach the end of the line with the NIXER X Jack Rabbit range, and what a way to go out.....for now!
Lost Vape E Plus RBA
Antony follow up on his Lost Vape Thelema Elite 40 kit review with his thoughts on the E Plus RBA kit


